# O365 Login - Manual
# Setting up Azure App registration
The main idea is that the Epona azure portal contains an App Registration for ContactManager. But this app registration can be created on the tenant of choice. The registration should be configured with the settings described below.
# Account types
When creating a new app registration, you will have to choose which account types may access the application. First option will allow users known in the current tenant to authenticate. Second option will allow any tenant to authenticate and the last option also allows “common” Microsoft accounts to authenticate (e.g. username@outlook.com).

# Redirect URI's
When connecting a new CM environment, you need to add a redirect URI to the app registration. This URI should point to the authorize page of the ContactManager installation:
https://someinstallation.eponalegal.com/Login.aspx/Authorize
Replace the first part of the URL with the installation URL in question.
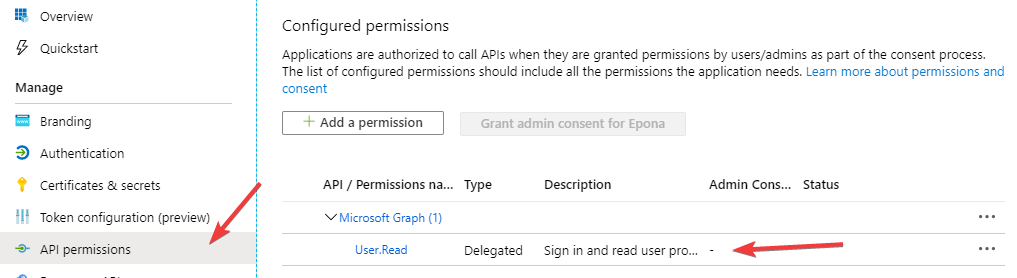
# Permissions
The permission for scope “Microsoft.Graph > User.Read” should be added.
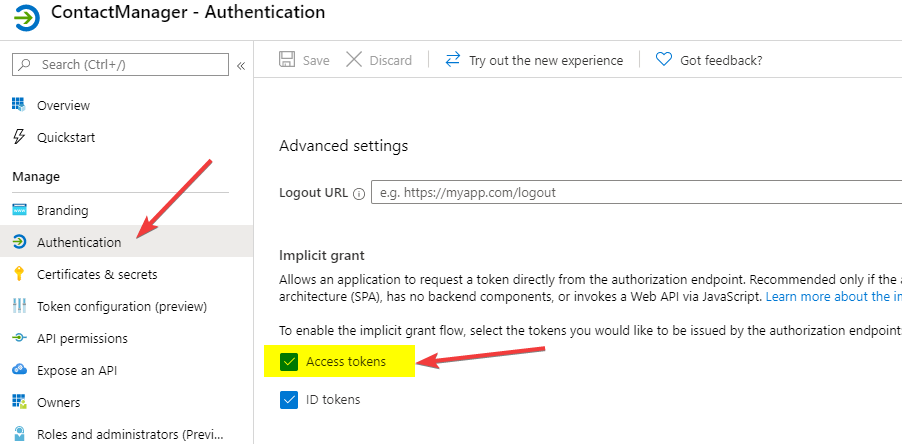
# Implicit Grant
The checkbox to enable implicit grant flows for access tokens and ID tokens should be checked in order to request data directly with a token.
When all that is set, you are ready to configure ContactManager. Keep the tab with the app registration open, because you will need ids from the overview tab.
# Setting up ContactManager
Open the CRM Configuration screen and navigate to the General configuration. Within this configuration you will find four settings that can be set for the Office365 implementation.
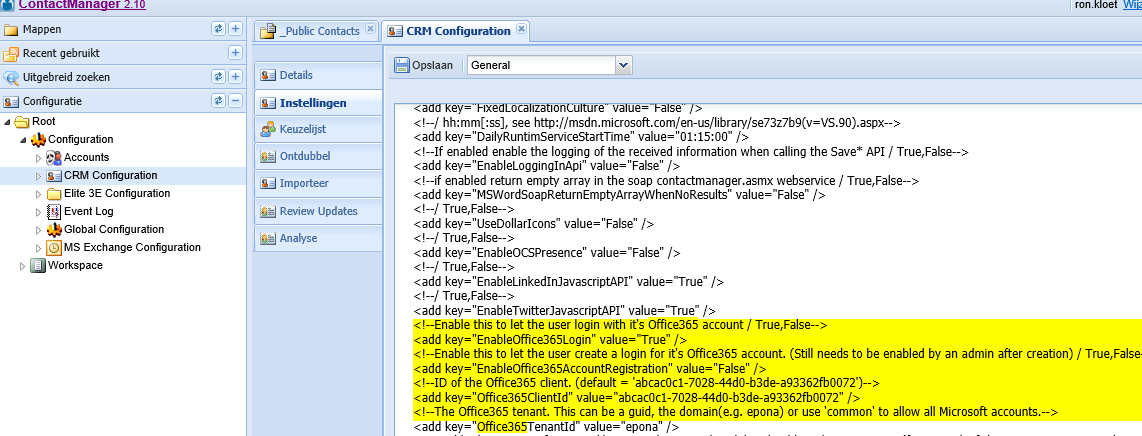
These settings are described below.
# EnableOffice365Login
This does exactly what the name tells us, this will enable or disable the O365 login functionality. (e.g. the O365 login button will be hidden when disabled)
# EnableOffice365LoginAccountRegistration
Enable this if you want a new user that has authenticated with O365, but hasn’t got an account in ContactManager, to register a new account. This account will be disabled by default, and an email will be sent to the data steward about this registration, so that the account can be finished and enabled by the administrator.
# Office365ClientID
This is the client Id of the app registration. This id can be found here:

# Office365AdditionalAllowedClientIds
This field can be populated with multiple app/client id’s separated by a semicolon( ; ) or a comma( , ). These client ids will be accepted when validation a token when logging in with an Office 365 account. Add "abcac0c1-7028-44d0-b3de-a93362fb0072" to allow the Epona multi tenant app used by applications like LegalWord.
# Office365TenantID
This is the ID underneath the client ID. Set this to the tenant you wish to use to authenticate to. Easier is to enter the domain name in this setting like so:

This value is used to create the redirect URL to which you will authenticate (either domain name or tenant id is accepted): https://login.microsoftonline.com/##TENANTIDGOESHERE##/oauth2/v2.0/authorize (opens new window)(...)
To accept all Microsoft accounts, you could choose “common”, but this is not recommended as this allows any (known) microsoft account to log onto ContactManager.
# How to use it
When all the settings are set and O365 authentication is enabled, you can login by using O365 in the ways described underneath.
# Using the website
Once you reach the login page, there will be an extra button that states the ability of logging in by your Microsoft account.

Clicking this will redirect you to the login page on the Microsoft tenant that is set in the configuration.
Login with your account details and submit the form. When ContactManager has found a user for your email address, it will be logged in (if not disabled, otherwise the user gets a notification about this).
# Using the webservice
Whenever someone tries to log onto the webservice, a username and password is needed. With this new functionality, it is possible to supply a username (email address) and an access token as the password. ContactManager will then validate the token data, and if all is valid and matches a user in the database, it will log the user in.
# Data flow
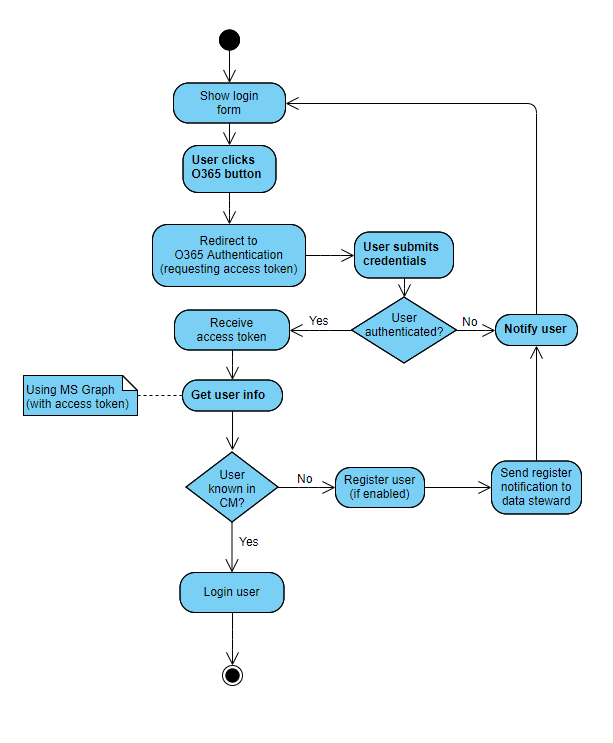
# Logging in with O365 Account using the website
Authentication via the website is pictured in the next activity diagram. Some actions are simplified to keep the diagram simple.